Translations:Camera/1/en: verschil tussen versies
Uit Wazeopedia Nederland
Nieuwe pagina aangemaakt met '==Camera== right|450px Before adding a <i>Camera</i> to the Waze map, you should make sure that it is indeed a Camera. There are many devices that look like speed cameras or red light cameras but are not.<br /> Cameras are displayed in the editor and can be maintained when Camera is checked in the Hazards map layer.<br> <br> A new <i>Camera</i> can be added by clicking on File:NL-WME-...' |
Geen bewerkingssamenvatting |
||
| Regel 10: | Regel 10: | ||
<br> | <br> | ||
Place the <i>Camera</i> at the desired location and specify the direction in which the camera flashes: one direction or both directions. | Place the <i>Camera</i> at the desired location and specify the direction in which the camera flashes: one direction or both directions. | ||
Versie van 13 apr 2025 10:29
Camera

Before adding a Camera to the Waze map, you should make sure that it is indeed a Camera. There are many devices that look like speed cameras or red light cameras but are not.
Cameras are displayed in the editor and can be maintained when Camera is checked in the Hazards map layer.
A new Camera can be added by clicking on ![]() in the top left corner of the editor and then - cameras are one of the types of Hazards - on
in the top left corner of the editor and then - cameras are one of the types of Hazards - on ![]() . Select
. Select ![]() Cameras here.
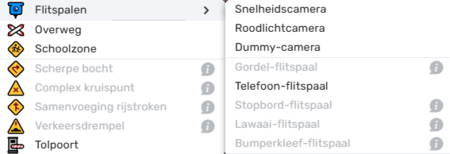
Then specify the desired camera type. Waze has a whole range of them. We only use:
Cameras here.
Then specify the desired camera type. Waze has a whole range of them. We only use:
- Speed camera - only checks for exceeding the Speed limit. The speed at which the check is made is the speed at which the driver is driving.
- Red light camera - checks for driving through red lights and speeding
- Dummy camera - does nothing.
Place the Camera at the desired location and specify the direction in which the camera flashes: one direction or both directions.
